Samples of currently available holographic plates and evaluation samples of Harman Technology Ilford brand materials are tested and compared. (Referred to throughout this tome as Harman, as opposed to the Ilford plates of yore, like from the late 1980’s.) The competition includes the BB-640 red sensitive and BB-520 green (orthochromatic) plates from Colour Holographics, Sphere-S panchromatic plates distributed by Geola, although they are also called GEO-3 here, plus some samples of Slavich brand PFG-01 and PFG-03M.
Notes about the holograms: For some materials, 2.5” (6 cm) square plates were used; otherwise 4” by 5” plates were quartered (although some not so successfully as is evident in the photos) for the maximum use of the materials.
The optics were arranged for a Single beam Reflection set up, about 2 meters throw from the spatial filter with a 20X objective. The 633 nm wavelength of a Uniphase 20 mW He-Ne measured 40 μW/cm2 flux in a beam spread that totally covers the waffle iron, but a bit shy of doing 8 by 10’s with my He-Ne. For the green wavelength, emitted from a 100 mW Coherent Compass the radiant flux was 70 μW/cm2, and its greater divergence through the same optics would more than cover an 8” by 10” plate if so desired to shoot a large one.
Multiplying the flux times the exposure time gave me the exposure energy measured in μJ/cm2, however this was just the energy in the reference beam, and not taking into consideration the object light.
A piece of cardboard cut to 2 ½” square with one square cut out of the corner was placed on the plate so that ¼ of the holo was exposed at a time, not unlike making a photographic print, for better economy of use of materials and side by side evaluation of exposure doses. The upper right corner is the lowest exposure, with the blocker being rotated counterclockwise so that the highest is in the upper left.
The object was a waffle iron, painted with Krylon #1401 Bright Silver spray paint, whose “pigment” is aluminum flakes, which is not only a good reflector but preserves polarization, giving as low a reference to object beam ratio as possible. For more gorey details, check out Making a Test Strip on this site.
Processing was done in Combi Plan tanks, with racks adjustable for the 4” by 5” plates and those 2 ½” wide. Different materials could then have exactly the same treatment done to them. A variety of developers were used as noted, and I started off using the dreaded CW-PBQ-2 bleach, but my stash of PBQ was oxidized to uselessness, so I switched to a Fe-EDTA formula, which I am not so happy about, since I had always noticed a shift in replay color.
Some plates need to be “activated” for lack of a better word, or rehumidified, and I simply soaked them for a couple of minutes in Kodak Photo-Flo, (Sorry, I still have half a bottle on hand, I will replace it with Ilfotol when the ‘Flo runs out.)
Evaluation criteria: Brightness is always paramount, and signal to noise or contrast is also necessary to make the image look as realistic as possible. Black should be black, and not making the object look like it’s under water or milk.
Another item of importance for me is whether the holographic replay color is the same as the laser’s, and the way to check it is to place the processed hologram back on the object and see if it steals light and casts a shadow, making the image brighter than the object under it. For even more finesse, if the material is truly a faithful reproduction, the image light of the hologram can be made to interfere with the residue object light, causing a real-time holographic interferometric pattern!
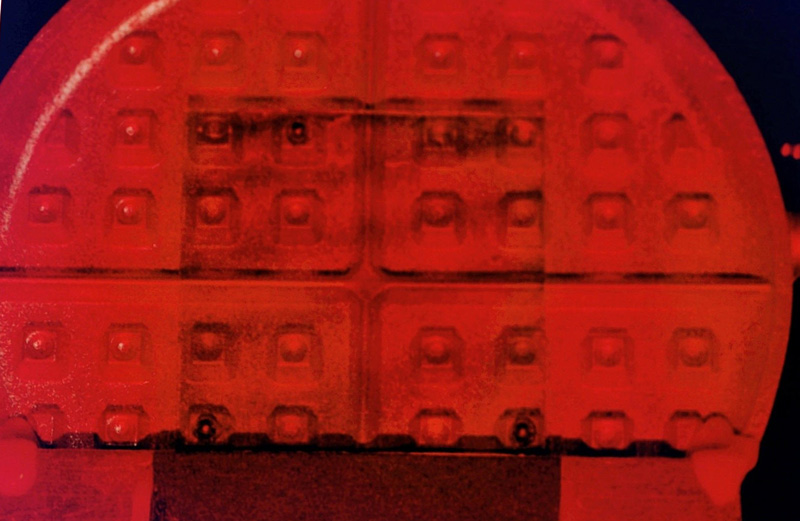
Notes about the photographs: They were all taken with a Nikon D3X and a 60 mm f/2.8 macro lens, moved in close enough so that the height of the hologram fills the short edge of the photo. The holographic plates were placed on black velvet (might notice some dust and hairs in the background) to give best contrast to the holographic image without painting their backs black.
Exposure was taken by reading a Kodak 18% grey card, a portion of which is visible along the right edge of the photos, so a sort of evaluation of diffraction efficiency can be observed in the photos. Surprisingly the Nikon and my trusty old Sekonic Studio Deluxe agreed about the exposures! The Nikon bracketed exposures, but the normal center one was the one used for this report. Sometimes a piece of black tape is at the top of the holograms to prevent annoying internal reflections, which are evident in some of the photos.
The HOLOGRAMS
Holograms #1-33
Holograms #34-61
Holograms #62-73
Holograms #73-104
Holograms #105-135
Holograms #136-156
Holograms #157-166
Holograms #167-177
Holograms #200-232
Holograms #233-253
The FORMULAE
Check out this part of this site for the toxic part.